BOTH3D Service

FAQ

Answers to common questions about installation, setup and use.

Reset

Topic 01

Setup and Assembly

5 questions

What screws do I need for assembly?

All screws required for assembling the camera arms, installing the camera modules, and attaching the various LED rings are included in the package.

For the base plate, all screws required for assembly, mounting the camera arms, and attaching the mounting bracket are also included.

You only need suitable mounting hardware (such as screws and wall plugs) to secure the components to your wall, as the required hardware depends on the wall type.

How are the cables laid?

The camera arms feature an internal cable channel. Insert the camera cable through the base of the arm with the white connector first, and feed it through the arm toward the camera mount.

If you have difficulty feeding the cable through the arm, separate the upper section from the base and route the cable through the channel step by step before reassembling the arm.

Route all camera cables toward the center of the dartboard.

If you are using a base plate, the cables can be neatly placed into the integrated cable channels for secure and organized cable management.

Both the 3D-printed base plate and the CNC-machined base plate feature dedicated cable exit openings, allowing you to route the bundled camera cables cleanly and conveniently.

How is the system mounted on the wall?

There are several ways to install the camera system:

  • Mark the drilling positions manually on the wall.
  • Mark the drilling positions using the drilling template.
  • Use a 3D-printed base plate.
  • Use a CNC-machined wooden base plate.

Recommendation

For the best installation experience, I highly recommend using a base plate.

A base plate not only reduces the number of required drill holes from 9 to just 4, but also ensures the correct alignment and precise spacing of the camera arms, resulting in a faster, easier, and more accurate installation.

What camera angles are recommended?

The traditional and recommended camera layout places one camera at the 6 or 11 position, with the remaining two cameras mounted 120° apart.

It is also possible to mount one camera at the 20 position.*

Mounting a camera at the 3 position is strongly discouraged, as bounce-outs may strike and damage the camera or the camera arm.

* In general, you are free to choose the camera positions as long as the three cameras are spaced 120° apart. However, depending on the chosen arrangement, slight differences in detection accuracy may occur.

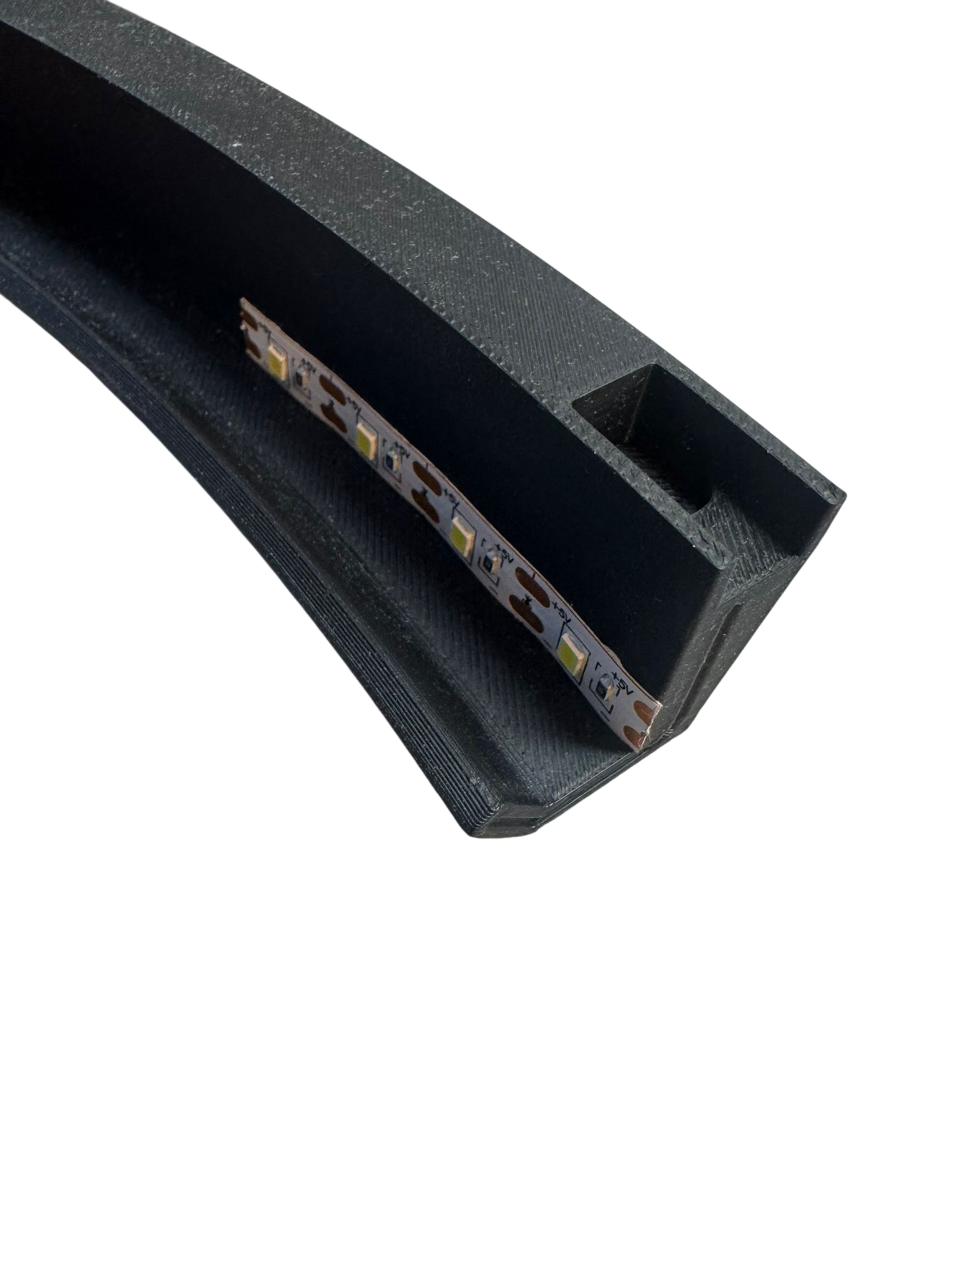
Where is the LED strip attached on the 3D-printed ring?

A common mistake is installing the LED strip in the wrong position inside the 3D-printed LED ring.

Install the LED strip exactly as shown in the illustration to ensure proper illumination and optimal performance.

LED strip required: approximately 2.4 m (7.9 ft).

Assembly position

Topic 02

Soundproofing

3 questions

Which soundproofing systems are supported?

I offer a wide range of mounting options to accommodate different soundproofing systems.

The most common options can be selected directly when placing your order:

  • Standard – No soundproofing; the mounting feet and dartboard are on the same level.
  • +20 mm – For DIY soundproofing systems.
  • +30 mm – Compatible with Karella soundproofing systems.
  • +45 mm – Compatible with the BULL’S Silencer.
  • +55 mm – Compatible with the Vilyzer soundproofing system.

Custom solutions are also available. If you require a different offset or a special configuration, please contact me using the contact form.

Is one base plate louder or quieter?

Testing and user experience have shown that using a base plate results in a higher noise level during play.

If noise reduction is important, the use of a soundproofing system is highly recommended.

Does soundproofing interfere with detection?

In general, no—but there are some exceptions.

As long as the camera arms are designed to compensate for the thickness of the soundproofing system, detection accuracy is not affected.

An exception is soundproofing systems such as the Winmau Wispa. These systems are specifically designed to absorb the impact of darts by converting the energy into movement rather than transferring it as resonance to the wall. As a result, the dartboard is mechanically decoupled from the wall.

Because the dartboard can move slightly during play, these systems may reduce detection accuracy.

Topic 03

Technical Questions

8 questions

Which camera modules can be used?

The following camera modules are compatible:

  • HBVCAM OV2710 (2 MP) – currently the most recommended camera. RECOMMENDED!
  • HBVCAM OV9732 (1 MP)
  • HBVCAM IMX179 (8 MP – full-resolution performance depends heavily on the available hardware.)
  • GXIVISION S1M01 OV9732 (1 MP)
  • GXIVISION IMX179 (8 MP – full-resolution performance depends heavily on the available hardware.)

Important: All camera modules should be equipped with a 100° lens for optimal compatibility and performance.

Not Recommended

Camera modules manufactured by DEXCIN are not recommended, as they exhibit inconsistent manufacturing quality and noticeable variations in performance.

Where can I buy the camera modules?

You can find links to the camera modules I recommend in my link collection.

I recommend purchasing the camera modules from AliExpress, where shipping typically takes 1–2 weeks.

While camera modules are also available on Amazon, eBay, and other marketplaces, they are often significantly more expensive, and there is a higher risk of purchasing counterfeit or low-quality products.

Why don’t my cameras fit into the printed parts?

This is a very common question. Sometimes the cameras are shipped with a frame attached to the circuit board. This frame must be carefully snapped off using pliers. IMPORTANT: Do not snap it off with your fingers, as this can damage the circuit board.

This is described again in my Quick Guide manual, which is included in the package. Or you can download it here.

What kind of lighting do I need?

The following lighting systems have proven to be completely reliable:

  • Winmau Plasma
  • Target Corona Vision
  • 3D-printed ring with LED strip (6000K)

The Mission Torus is also suitable, but it’s only a 270° ring.

Lighting systems such as the Winmau Polaris with a 120° beam are not recommended because they do not fully illuminate the dartboard.

Can I use a splitter cable or a USB hub for the three cameras?

In General, Yes – However, There Are a Few Important Things to Know

Approximately 95% of current OV2710 and OV9732 camera modules are shipped with the latest firmware, which supports operation through a 3-in-1 splitter cable or a USB hub.

However, reliable operation also depends on the capabilities of the USB host controller used by your computer, laptop, or Raspberry Pi. Available USB bandwidth and power delivery can vary significantly between systems.

For the highest level of reliability, I recommend connecting each camera module directly to its own USB port whenever possible. If additional ports are required, use a powered (active) USB hub rather than a passive hub.

This configuration provides the best chance of stable operation and long-term reliability.

What kind of computer do I need?

General System Requirements for AUTODARTS

Minimum Hardware Requirements

  • CPU: 4 cores or more, minimum 1.5 GHz
  • RAM: 1 GB
  • Storage: Less than 1 GB of available disk space


Windows 11

Official CPU Requirements*
  • Intel: 8th Generation or newer
  • AMD: Ryzen 2000 Series (Zen+) or newer

* These are Microsoft’s official minimum hardware requirements. While Windows 11 can be installed on older CPUs using unofficial methods or workarounds, this configuration is not officially supported by Microsoft.


Linux

My best experience has been with Linux Mint Xfce. It provides excellent stability and performs exceptionally well, even on older computers that are no longer officially supported by Windows 11.

My recommended system is an HP EliteDesk 800 G3 with an Intel Core i5-6500 or better. These refurbished mini PCs are widely available for under €100 and offer excellent value for running AUTODARTS.

Several Dell Wyse thin clients also perform very well under Linux. However, make sure the device includes the original Dell power supply, as only the original adapter allows the thin client to enter Boost Mode and deliver its full performance.


macOS

Both Intel-based (x64) Macs and Apple Silicon (ARM64) devices are supported.

The system must be running macOS 12 Monterey or later.


Raspberry Pi

AUTODARTS can also be operated on a Raspberry Pi. A Raspberry Pi 4 is the minimum recommended model, while a Raspberry Pi 5 is preferred for better performance.

However, for approximately the same investment, a refurbished mini PC such as the HP EliteDesk 800 G3 generally offers significantly higher performance and a better overall user experience than a Raspberry Pi.
What kinds of dartboards can I use?

You can use any dartboard, regardless of the manufacturer, provided it complies with the current official tournament dimensions.

Examples of compatible dartboards include:

  • Winmau Blade 5, Blade 6, Blade 6 Triple Core, Blade X
  • Target Aspar, TOR
  • Unicorn Eclipse, Eclipse 2.0
  • Precise180 Endorphine
  • …and many others.

As long as the dartboard meets the official tournament specifications, it can be used with the system.

What number rings can I use?

AUTODARTS is compatible with all analog and digital number rings currently available on the market.

Colored number rings, such as those offered by Precise180, are also fully supported.

You can also play without a number ring. In this case, you must perform the camera calibration manually or use a dartboard surround with an integrated number ring.

Topic 04

Troubleshooting and Workarounds

3 questions

How do I adjust the focus on the cameras?

Community member Zoofly85 has developed a web application that makes it easy to achieve perfect camera focus.

Dart Focus Station by Zoofly85 (external link)

Quick Guide

  1. Close the AUTODARTS Desktop application or the AUTODARTS Client.
  2. Open the Dart Focus Station and allow your browser to access the cameras.
  3. Download the linked PDF, print the Siemens Star, and attach it to a piece of cardboard.
  4. Place the Siemens Star between the surround and the dartboard, directly opposite the camera you want to adjust.
  5. Select the corresponding camera and click the center of the Siemens Star in the live image. The status should display 100% Locked.
  6. Scroll down slightly and monitor the Laplacian Var value on the left side.
  7. Rotate the camera lens slowly. The Laplacian Var value will change as you adjust the focus. Set the lens to the position that produces the highest possible Laplacian Var value.
  8. Repeat the process for each remaining camera.

My FPS isn’t stable – what can I do?

If you experience lag, dropped frames, or unstable camera performance, the following are the most common causes:

  • System overload – Check your system’s resource usage in the Task Manager. High CPU or memory usage can negatively impact camera performance.
  • USB controller overload – Connect the cameras to different USB ports, preferably on separate USB controllers. If possible, spread the cameras across physically separated USB ports and restart your computer afterward.
  • Camera resolution set too high – Lowering the camera resolution reduces system load and often results in more stable camera performance.
  • USB bandwidth limitations – Using a powered (active) USB hub can improve stability, especially when multiple cameras are connected.

A camera is flickering – what can I do?

If a camera is not detected or disconnects during operation, the following are the most common causes:

  • Loose USB connection – Check all cable connections and reconnect the USB cable. If possible, test the camera using a different USB port.
  • Faulty or incompatible USB extension cable – Remove the USB extension cable and connect the camera directly to the computer to determine whether the extension is causing the issue.

Topic 05

WLED Setup

2 questions

How do I set up WLED on my computer?

For this purpose, I provide a dedicated step-by-step guide.

You can find it here: BOTH3D WLED Guide

What commands are available for Autodarts Tools?

AUTODARTS Tools supports a variety of trigger commands that can be used to activate custom effects.

Board Status

  • board_stopped – Board stopped
  • calibrations_started – Calibration started
  • calibrations_finished – Calibration completed

Game Events

  • gameon – Triggered at the start of a game (default replacement effect)
  • takeout – Darts are removed from the board
  • gameshot – Player wins the current game/leg
  • gameshot+d20 – Player wins the game/leg with Double 20 (also supports d10, d5, etc.)
  • matchshot – Player wins the entire match
  • matchshot+bull – Player wins the match with a Bull finish (also supports d20, d10, d5, d1, etc.)
  • busted – Player busts
  • idle – Triggered when the game is exited (idle state)

Score-Based Triggers

  • 0 to 180 – Triggered for a specific score (e.g. 180)
  • range_100_180 – Triggered for any score within the specified range (e.g. 100–180)

Lobby Events

  • lobby_in – Player joins the lobby
  • lobby_out – Player leaves the lobby

Tournament Events

  • tournament_ready – Tournament starts

Player-Specific Triggers

  • Player Name – Use the player’s name exactly as it appears in AUTODARTS. This trigger overrides the default gameon effect for that specific player. Spaces are supported (e.g. Max Muster).
  • bot_throw – Triggered when the bot’s turn begins.
  • gameshot_Max Muster – Triggered when Max Muster wins a game/leg.
  • matchshot_Max Muster – Triggered when Max Muster wins the entire match.

Topic 06

General

1 question

What do I need to enter in Autodarts Tools to start my effect?

In your WLED controller, create one or more presets. Each preset is assigned a unique number and can be activated via a URL within your local network.

Below is an example URL that activates Preset 5. Enter this URL in AUTODARTS Tools for the corresponding trigger.

http://192.168.1.100/win/PL=5

Replace 192.168.1.100 with the IP address of your WLED controller.